All-on-four: a quick fix
Davide Accetto and Robin Horton present a case in which cutting-edge technology transformed a patient's smile in one day.
28th May 2026
Author: Davide Accetto & Robin Horton (Practice principal - Wayside Dental)
CASE OVERVIEW
Robin Horton
A patient presented as a walk-in having seen our signs for some years while walking his dog. His lower teeth had lost their stability, meaning he could no longer bite (Figure 1). He wanted a fixed solution for his lower teeth and to be able to eat 'normal' food again. His medical history was unremarkable for his age (72).
We discussed all-on-four as a good solution for him. Fastmap had just become available too, as had a new material from Sprintray called Onx Tough 2. This meant we could print a strong provisional bridge screwed onto the multi-unit abutments on the same day.
I used DTX Studio to plan the implant positions (using CBCT and intraoral scans).
I then sent this data to Davide to design a screw-retained bridge in Exocad (Figure 2).
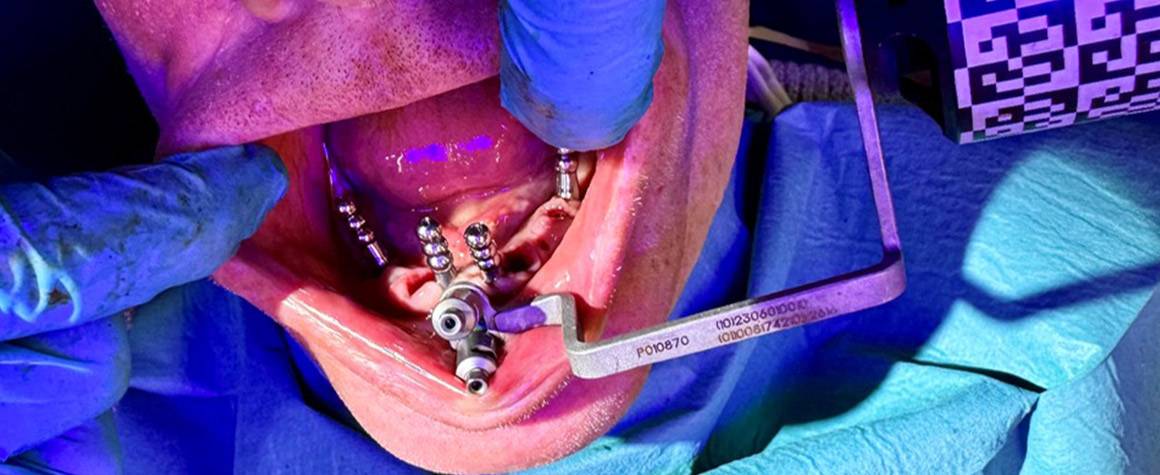
I used X-guide to navigate the implants, and then we fitted the multi-unit abutments. After this, I used Fastmap photogrammetry to digitally map the implants. This uses special scan bodies that fit the multi-unit abutments and twin cameras from the X-guide to record the positions of the implants, which is more accurate than intraoral scanners. We sent this data to Davide, plus an intraoral scan of whitecaps on the multi-unit abutments. This helps him shape the soft tissue part of the bridge.
I used a Waterlase for the surgery and a diode laser for photobiomodulation (PBM) after the procedure. We sent the patient home for a few hours while Davide finessed the bridge design, which he printed using Sprintray and Onx Tough 2. He then painted it to make it look like teeth.
CHALLENGES
Davide Accetto
The biggest challenge we faced was with myself. I knew I was the first dental technician in the UK to implement this digital workflow for immediate load, and despite my advanced knowledge in dental technology, I couldn't shake the concern of potentially failing on surgery day. But isn't that what innovation is all about? To progress, we must take risks. After some hesitation, I stepped out of my comfort zone and embraced the opportunity for this exciting collaboration with Robin.
For those familiar with Exocad and the full-arch digital workflow, designing this type of restoration may not present many obstacles. However, the most challenging part is the implant conversion. It needs to be done quickly during surgery to allow enough time for printing and finishing the restoration.
Robin Horton
The challenges here were doing something new and finding a technician who I could communicate with well enough to get the desired result. I was given Davide's name by a friend, and we understood each other straight away. It was important for me to have him onsite for this first one as I have a tendency to stain up the ceramic.
Patient selection is crucial too, and this gentleman was a perfect patient: friendly, local, enough bone to not need grafting and enough time to come in for the various stages, though with this new technique, we cut down the stages quite a bit.
X-guide is very flexible as there is no printed guide, you have good access to it, and you can change your plan if you need to and still be guided. I found that I had planned one implant too close to a tooth socket for stability, so I moved the implant on the X-guide, looked on the CBCT image to check for bone, and then carried on. My dental nurse never noticed, it was that quick. It is a great tool to have.
TECHNICAL WORK
Davide Accetto
Step one: bridge wax-up
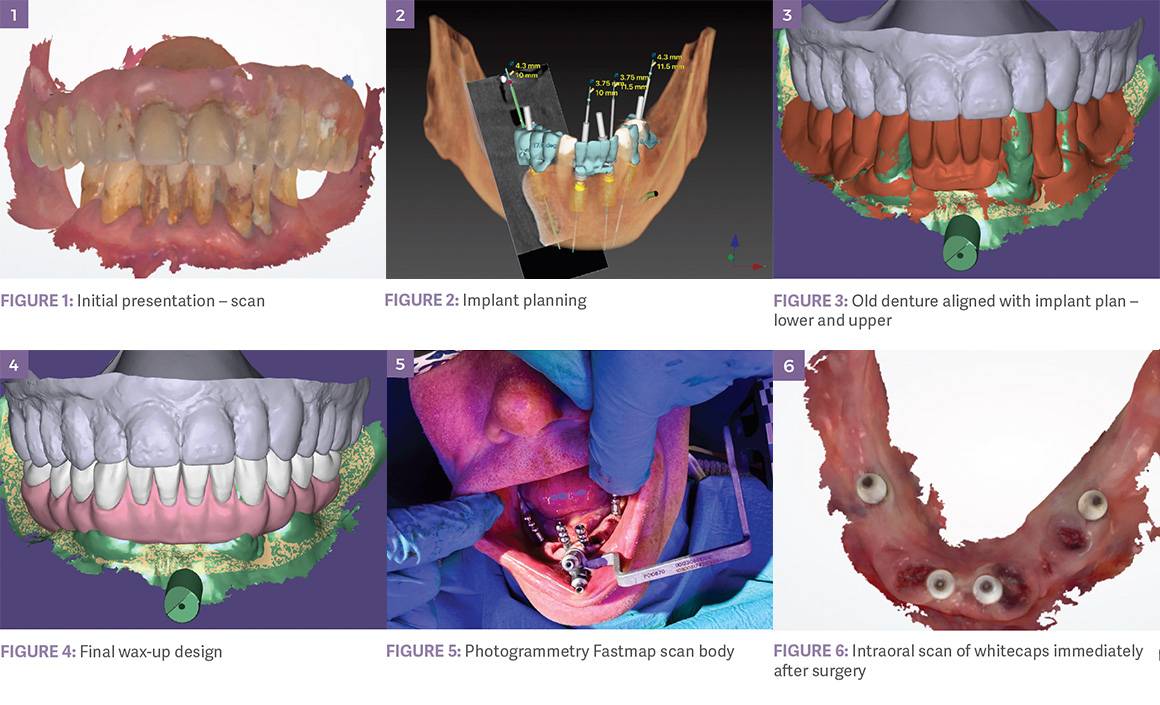
I made sure that the implant's plan scan was properly aligned with the lower jaw, with the denture in place if available, and the antagonist in occlusion (Figure 3). This helps you visualise the ideal implant placement for planning the bridge.
It's essential to design the bridge wax-up to a finished state, as this will allow you to focus solely on the implant conversion during surgery, giving you more time and avoiding the need to revisit aesthetic adjustments later on (Figure 4).
Step two: digital implant conversion
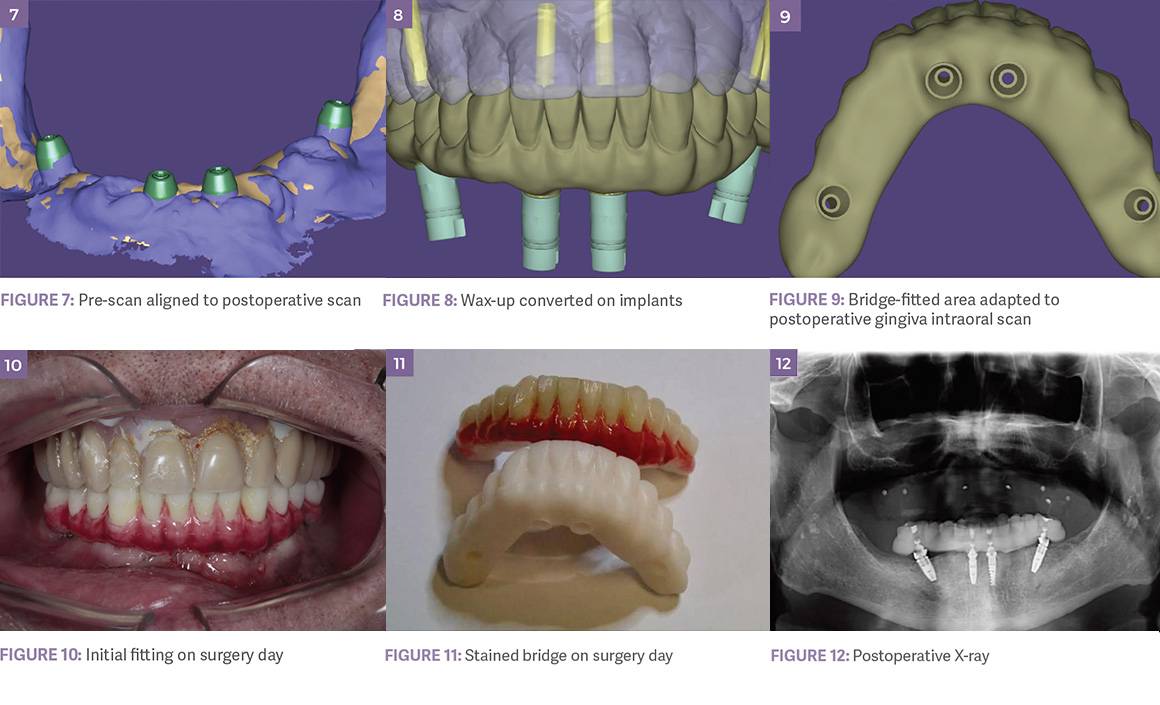
Thanks to the 3D coordinates obtained from the Fastmap photogrammetry system, the multi-unit abutment coordinates automatically aligned with the preoperative scans (Figure 5). However, I would advise taking a postoperative scan as well to help the technician designing the converted bridge on the latest soft tissue information – this can be all aligned together with a preoperative gingiva scan by creating a dummy order on Exocad before moving to the final design (Figures 6 and 7).
Next, I created a new order in Exocad for the final temporary bridge, selected the Nobel temporary bridge libraries to align directly whitecap multi-unit abutments and converted the planned wax-up directly onto the implant connections. At this point, I could focus on refining the bridge fit area and shaping it for optimal functionality and aesthetics based on the most recent postoperative gingiva scan (Figures 8 and 9).
Step three: printing and finishing
The print was carried out directly at Wayside. To avoid any potential issues, we decided to print two arches. After completing the post-process cleaning with isopropyl alcohol (IPA), the bridge was ready to be cured and stained.
This entire process was made possible through a strong collaboration between the clinician and technician. The advanced digital resources used also made this workflow intuitive and easy to follow.
FINAL PRODUCT
Davide Accetto
The bridge fitted passively like a glove on the implants, and Robin and I looked at each other quite surprised and relieved knowing we wouldn't need to resort to a back-up plan (Figure 10).
However, the aesthetics weren't up to my usual standards. The only Onx shade available was a bleach shade and transforming it into a darker tone proved to be quite challenging. This new material is difficult to stain, which meant I had some trouble with the GC Optiglaze colour as they are runnier than other brands (Figure 11).
Robin Horton
Usually with pick-up conversions, we chop loads off the temporary to get the occlusion remotely close – with intraoral scans and lab-made temps, a passive fit is hard to attain. His bridge just dropped in place with no occlusal adjustment required (thanks to Davide's skill), and it fit so passively you could tighten each individual screw fully if you wanted to (Figure 12).
It was so amazing that I remarked on it to Davide. The patient heard me and said: 'Why are you surprised?' – and we all laughed!
REFLECTION
Davide Accetto
The entire workflow was truly remarkable. The ability to design, manufacture and load the bridge directly on implants, without relying on temp cylinders and traditional denture conversion methods, was incredibly refreshing. I don't believe there is a more accurate workflow or better material than the one we used for this case.
Using a 3D printer at the practice made a significant impact on the manufacturing process. Additionally, being able to print the same file twice gave us extra time to finish the second bridge at the lab with Vita Akzent LC colours, which made staining much easier.
Looking ahead, we can see that printing two bridges can enhance efficiency, allowing us to complete the workflow remotely without needing the technician onsite during surgery day.
Robin Horton
This technique really simplifies the all-on-x process. It is so accurate that you can feel confident in a lovely result for the patient (Figure 13). You need to supply the technician with the correct records to start with – that's where the communication comes in, and it was good to have Davide onsite for the procedure. But now we have done a case, Davide can design and finesse on the day remotely and send us the file to print. Printing two bridges is a must. We can fit one and post the other to Davide to paint for us, and we can swap them over later. Having watched him painting this one, I am not going to even attempt it!
The patient was walking his dog the day following surgery and since he had no pain or swelling, he decided to pop into a local café and have a cooked breakfast for the first time in a long while. He is delighted, and for my part it is a privilege to be able to improve someone's quality of life. Next stop is his uppers!

Get in Touch
Let's discuss how Nifty Dental Solutions can help you and your customers. Please leave your details and we’ll be in touch.